Documentation -- House NA Tokyo, Japan -- Sou Fujimoto Architects
Experimentation - since it is my first time soldering ever, I decided to practice with some scarp metal first to make sure i can get the best kind of joints with soldering
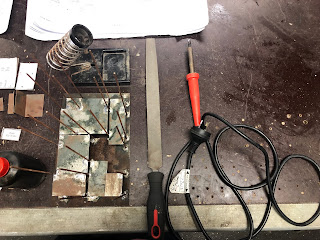
Tools that are used for my practice: soldering iron - small, flat head to make sure it heats up properly and the flat head makes sure that enough area is heated to conduct the flux; flux - acidic soldering fluid which indicates where the solder will flow to; solder - make sure that flux is not built in with the solder wires; brush - to brush off excessive solder wire


Experimentation - when soldering from the bottom (in the air), gravity plays a big role into this, where the melted solder wire will be gravitated towards the bottom of the rod/sheet; which means I need to think whether this is the aesthetics I am looking for or I will need to find another way to make sure this big 'blob' does not show


Experimentation - the model continued to rust (these photos were taken a week after the model was made)


Preparation - as seen in the photos, skewers are falling apart, as well as each the templates of each floor plate need pierce through the skewers to achieve the affect


Preparation - after the ground floor is established, the columns (rods) will need to placed

Preparation - the punch set and a hammer are used to mark out the positions of each column

Preparation - it is important to understand the height of each columns, specifically which columns go through which level and which level they stop
note: by studying the plans for all the levels and learning each columns height really saved a lot of time for this process


Assembly of the model - the first few columns are soldered on (as before the model finishes, all the metal rods are very dangerous for public transports)


Preparation - I found using the smallest flat head soldering iron is very helpful to conduct heat as well as being precisely
note: I did try a soldering iron around the same size with a pointy head, but it did not conduct heat well, the solder wire could not stay on the iron nor it could properly contact with the model joint


Preparation - safety glasses as well as my vision glasses are needed, markers, metal ruler, masking tape and a metal stick as flux brush are very important to measuring the difference between each floor plate

Preparation - scrap metal (left), guides and supports for the process of soldering (right)

Preparation - different grades of files are needed for different purposes, it is important to file down edges after cutting as metal can cause injuries

Preparation - making sure that solder wires are without in-built flux, and 60% tin 40% lead

Preparation - 'baker's ' soldering fluid (flux) works very effectively

Preparation - another day of model making


Assembly of the model - the early stage of the model: angle shots and detail shots


Assembly of the model - the final stage of the model: the model itself is now completely finished


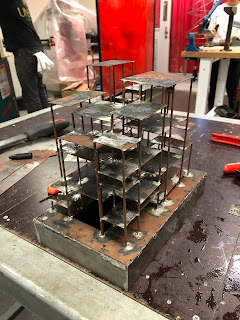

The final model - steel continues to rust, and the joints where are covered by melted solder wire are becoming more and more distinctive compare to the rusty appearance

Tools that are used for my practice: soldering iron - small, flat head to make sure it heats up properly and the flat head makes sure that enough area is heated to conduct the flux; flux - acidic soldering fluid which indicates where the solder will flow to; solder - make sure that flux is not built in with the solder wires; brush - to brush off excessive solder wire

Experimentation - all kinds of joints are experimented: curved sheet on a flat sheet; metal rods on sheets; metal rods on metal rods, etc., this way I could judge which kind of joints is the ones I am looking for
note: only steel can be soldered in this case, so all metal sheets/rods will have to be steel


Experimentation - when soldering from the bottom (in the air), gravity plays a big role into this, where the melted solder wire will be gravitated towards the bottom of the rod/sheet; which means I need to think whether this is the aesthetics I am looking for or I will need to find another way to make sure this big 'blob' does not show


Experimentation - as the nature of steel with the acidic flux, the model started rusting very soon after finishing, however, the joints (where melted solder wire are covered) stay polished


Experimentation - the model continued to rust (these photos were taken a week after the model was made)


Experimentation - the model continued to rust (these photos were taken a month after the model was made)


Preparation - a testing model with papers, cardboard and skewers were used, intimating the idea of the metal model intended
note: this testing model is very helpful in the way it helped me understand the structure of this model very well, and the level difference; however, this paper model is also very different to the metal model, where metal rods are a lot stronger and more stable, as well as metal sheets are not to go through each rod - as the paper templates needed to go through the skewers, the measurements became very inaccurate and difficult to align

Preparation - as seen in the photos, skewers are falling apart, as well as each the templates of each floor plate need pierce through the skewers to achieve the affect


Preparation - ground level floor plan is glued to a steel sheet and then cut down into shapes with the metal cutter

Preparation - after the ground floor is established, the columns (rods) will need to placed

Preparation - the punch set and a hammer are used to mark out the positions of each column

Preparation - it is important to understand the height of each columns, specifically which columns go through which level and which level they stop
note: by studying the plans for all the levels and learning each columns height really saved a lot of time for this process

note: sometimes while model making, not all tools and materials are, so this time I made a little container for the flux as the flux lead is occupied (normally I would use the lead)

Assembly of the model - the first few columns are soldered on (as before the model finishes, all the metal rods are very dangerous for public transports)

Preparation - preparing tools that are going to be involved saved times for me
tools (from top to bottom, left to right): plans with markings, glasses (safety glasses), metal rods, glue (for sticking down plans onto metal sheets), marker, metal ruler (plastic rulers are not helpful as heat can easily melt plastic), scrap metal pieces, solder wire, flux, solder iron holder, file, soldering icon, and my half-done model


Preparation - I found using the smallest flat head soldering iron is very helpful to conduct heat as well as being precisely
note: I did try a soldering iron around the same size with a pointy head, but it did not conduct heat well, the solder wire could not stay on the iron nor it could properly contact with the model joint


Preparation - safety glasses as well as my vision glasses are needed, markers, metal ruler, masking tape and a metal stick as flux brush are very important to measuring the difference between each floor plate

Preparation - scrap metal (left), guides and supports for the process of soldering (right)

Preparation - different grades of files are needed for different purposes, it is important to file down edges after cutting as metal can cause injuries

Preparation - making sure that solder wires are without in-built flux, and 60% tin 40% lead

Preparation - 'baker's ' soldering fluid (flux) works very effectively

Preparation - another day of model making


Assembly of the model - the early stage of the model: ground level and first level


Assembly of the model - the early stage of the model: it is a trial and error stage, as metal rods also take some space so each floor plate is not strictly to its scaled size


Assembly of the model - the early stage of the model: working progress

Assembly of the model - the early stage of the model: ground level, first level and second level are mostly done

Assembly of the model - the early stage of the model: angle shots and detail shots


Assembly of the model - the final stage of the model: ground level, first, second and third levels are finished


Assembly of the model - the final stage of the model: the start of the roof level


Assembly of the model - I decided to make a base for the model just so the scale and complexity of the model itself is further highlighted


The final model - steel continues to rust, and the joints where are covered by melted solder wire are becoming more and more distinctive compare to the rusty appearance


Comments
Post a Comment